Chapter 11
Basics of Film Lighting
Lighting is a difficult skill to master in Basics Of Film Lighting. This is true regardless of whether your video is for YouTube or the big screen. This quick guide will help you to understand the various types of lighting and how they can be applied to your work.
Before we get to all that, let’s first consider why lighting is necessary.
Basics Of Film Lighting
The majority of lighting in a film is used to create a natural look unless it’s necessary for a particular cinematic effect.
When it comes to lighting, the biggest paradox is that you must add a lot of artificial light to make your film look natural.
As unlikely as it sounds, the simple explanation is that video camera equipment doesn’t see things like the human eye.
The most important basics of film lighting are the massive amount of subtle variations between very bright and very dark in natural light.
Video on the other side, however, is unable to handle that level of detail as well. Instead, it creates extreme contrast.
You can make dark areas black or white, and you lose any subtle variation/detail.
Although artificial light may seem overwhelming to some, it is actually there to allow the camera to see the scene just like the human eye. This gives you a more natural-looking scene.
11.1 Three-Point Lighting
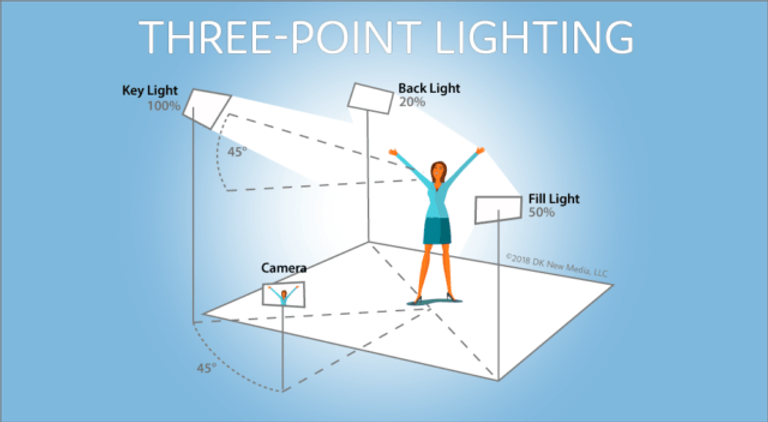
You will often hear filmmakers refer to three-point lighting, which is the most common lighting arrangement. The name implies that you aim light at your subject from three points in order to create separation from the background.
Three-point lighting is composed of three lights with different settings, each one creating the desired effect. Let’s take a closer look at each of the three lights.
Key light
This is the main light source in the setup. This light is used to illuminate the subject. It is brighter than the other lights.
It is crucial to position your key light correctly because it sets the tone of the whole frame.
Fill lights
To fill in the shadows left by the key lights, fill lights can be used.
Without proper lighting, dark areas of the video can become black as we have already mentioned.
Fill lights can still be used correctly to create shadowed areas within the frame, but key features will still be easily visible.
The fill lights aren’t as bright as the key lights, and they tend to be on the opposite side.
Backlight
As the name implies, the backlight is designed to illuminate your subject from behind.
The main purpose of the backlights is to add depth to your scene and prevent it from appearing flat.
You don’t want to have a lot of light in your frame behind your subject, so the backlight should be placed above the scene at the right angle.
11.2 Understanding the basics
Understanding three-point lighting is only the beginning.
It is possible to get terribly wrong if you don’t grasp the basics.
To achieve the best lighting, it is important to understand the importance of each point.
Light Ratio
The light ratio is the relationship between the key (highlight) side and the fill (shadow).
A lighting ratio of 1.1 would be achieved if there is an even amount of light from both sides.
A lighting ratio of 2 means that the key side is 1 stop brighter. A lighting ratio of 4 means that it’s 2 stops brighter and a lighting ratio of 8.1 means it’s 3 stops brighter.
The more dramatic the shadows, the higher the ratio. These are just a few examples:
A reference to a specific ratio will help you avoid misinterpretation when communicating with your lighting technicians.
Now we have established the most basic type of lighting for filmmaking and its application. It’s not only about how you use light to make your video look cinematic, but also about being creative. It’s not enough to have the right subject matter. It’s also about how it is translated on the screen.
The point of the content will be lost if the viewer doesn’t connect with it. However, there are ways you can gently push the viewer toward the right emotion.
Let’s now look at some of the most popular cinematic lighting effects and how to use them. We now know that the key lamp is the primary source of three-point lighting, but it’s also important to consider how you position it.
High-Key
High-key lighting refers to when the intensity of the key lights is increased, creating a frame that has lots of white and bright tones.
It will be very light in black if any. Mid-tones can also become white. When combined with plenty of fill light, high-key lighting creates a bright and shadowless scene.
This type of key light gives an extremely balanced ratio and despite being common in the golden age of Hollywood, these days it’s more often used for product placement/commercials. It is often used to indicate hope, warmth, and optimism.
Low Key
Low key is the opposite of high key in that it creates lots of shadows and uses very little fill light.
This type of lighting, however, focuses on darkness to put the corresponding atmosphere before the main subject.
This type of lighting is still used in horror films, thrillers, and fantasy films. It is often used to indicate mystery, drama, and suspense.
Practical Light
Practical light is the best type because it’s in the shot. If you see a candle, lamp, or other physical light on a screen, it’s a practical light.
This type of light is not only useful for illuminating your screen but also adds depth to your shot.
It adds perspective to the scene, whether it is illuminating the main subject area or another area.
This type of lighting can be difficult to control. A typical household lamp can be turned on or off. This is why dimmer switches are used so that the perfect balance is achieved. To soften the light, a handkerchief of cloth is placed on top.
Another way to deal with this issue is by using diffusion gel around the bulb to absorb some of the intensity/brightness.
You can also use Diffusion Gel in other colors to alter the color of your frame.
Sidelight
Sidelight, again, is directed from the side of the subject, just like the name implies.
Sidelight’s main purpose is to create an atmosphere of drama where the primary subject is often exaggerated.
This is due to the starker contrast between light & dark caused by the sidelight.
You have to decide how much contrast you want to create the shot that is right for you.
To create a harsher contrast, reduce or eliminate the intensity of the fill lighting.
You will have a stronger contrast without the fill light-enhancing details in the shadows. It is less about subtle detail and more about textures.
This creates a sense of mystery and suspense, which can be dramatic.
Bounce Light
It can take many forms, but it basically means that light is reflecting off of a surface. Any surface you have, including walls, ceilings, and floors, can be used to create bounce. This is a great way to make the most of your surroundings, but it also limits your control.
Different surfaces reflect light differently so there are tools that can be used to help control intensity. Foam boards are an inexpensive and widely used tool to reflect light. They reflect light in a soft way because of their matte texture.
Soft Light
Soft light refers to any light source that bounces off reflective surfaces or translucent materials between your actors and the lights, creating a softening effect. There are many ways to create soft lighting.
You can either bounce light off a ceiling or white card or use a portable lighting device with the bulb facing in a reflective housing that bounces back the light.
You can diffuse light by placing a transparent cloth-like material on top of the bulb. This will filter out any direct, harsh light that falls on your subject. This type of soft light can be found in a lampshade, which is an example of a lampshade. It’s rare for a room to have open light bulbs. Rosco (www.rosco.com) makes a line of light diffusion and color correction filters called Cinegels. This includes cloth diffusers. PRL Lighting (www.prllighting.com) encloses its LED lights with a soft covering called a softbox to diffuse and soften as well as minimize shadows when illuminating your subject.
This does not refer to a specific type of lighting, but rather to the size and intensity of the light source. Soft light is created by a larger source, with greater coverage and less shadow.
Sidelight is a hard light that can be used to add drama or suspense to a scene.
Hard Light
Hard light can create a harsh, bright appearance on your subject. It should be avoided as it is not flattering for most subjects. The intense rays from the sun are an example of hard lighting. Professional filmmakers prefer to shoot outside on cloudy or rainy days, as the clouds help diffuse the sun and add softness. For larger productions, the lighting crew will place a large translucent white tarp on a frame on top of the outdoor set to block the sun’s rays from hitting the actors. To diffuse harsh sunlight and provide a more soothing light for your actor, hold a translucent cloth, such as a white bedsheet, in close-up shots.
Motivational Lighting
Motivated lighting refers to the act of mimicking or, more often, enhancing light sources.
Artificial lighting can be used to mimic or enhance natural light, for example by placing artificial lighting outside the windows of a set.
Practical lighting is the same. If you think of candles or lanterns, they aren’t enough to adequately illuminate a frame.
In this way, the audience is often given some artificial light to help them.
This is the trick to ensuring that the artificial light in your shot looks natural and not from an external source.
Kicker Lighting
Kicker lighting is a simple, but very effective technique that places the backlight on the side of the subject’s face.
When combined with low-fill lighting, this creates a rim of or outline of bright sunlight. It’s an extremely powerful effect that can be used correctly.
These are great examples of lighting that you could add to your video. But remember, you can also use any lighting in the location.